
Forms are an important part of almost every website. Whenever you create an account, sign up for a newsletter, contact a business, make a purchase, or log in to a website, you are usually interacting with an HTML form.
But simply creating a form is not enough. You also need to make sure that users enter the right information before the form is submitted. For example, an email field should contain an email address, a required name field should not be left empty, and a password may need to meet certain requirements.
This is where HTML form validation becomes useful.
Form validation allows a website to check the information entered by a user and provide feedback when something is missing or incorrect. The good news for beginners is that HTML already provides several built-in validation features, so you can perform basic validation without writing a lot of JavaScript.
In this guide, we will explain HTML form validation step by step, look at the most useful validation attributes, and build a simple example that you can use in your own practice projects.
What Is HTML Form Validation?
HTML form validation is the process of checking whether information entered into a form meets certain requirements.
Imagine a registration form that asks for:
- Full name
- Email address
- Password
- Age
You may want to make sure that:
- The name is not empty.
- The email looks like a valid email address.
- The password has enough characters.
- The age is within an acceptable range.
Validation helps check these conditions before the form is submitted.
Instead of allowing incorrect or incomplete information to pass through, the browser can display a message asking the user to correct it.
Why Is Form Validation Important?
Without validation, users could accidentally submit incomplete information.
For example, imagine a contact form that asks for a name and email address. A visitor could click the submit button without entering anything.
That creates a poor user experience and may also cause problems for the website.
Validation helps by providing immediate feedback.
It can:
- Prevent empty required fields.
- Check the format of information.
- Reduce accidental mistakes.
- Improve the user experience.
- Help developers receive cleaner data.
However, it is important to remember that browser validation should not be the only security or data-checking method for a real application. Server-side validation is also important because users can bypass browser-based checks.
HTML Provides Built-In Validation
One of the best things about HTML forms is that you do not always need JavaScript to perform basic validation.
HTML provides attributes that tell the browser what type of information a field expects.
Some commonly used validation features include:
requiredtypeminlengthmaxlengthminmaxpattern
These attributes can handle many common validation requirements.
The required Attribute
The required attribute is one of the simplest ways to validate a form.
It tells the browser that a field must contain a value before the form can be submitted.
For example, if a name field is required, the user cannot leave it empty.
The browser will automatically display a message when the user attempts to submit the form without providing the required information.
This is particularly useful for:
- Names
- Email addresses
- Passwords
- Addresses
- Other important fields
You do not need to write complicated JavaScript just to make a field mandatory.
The type Attribute
The type attribute is also useful for validation.
HTML provides different input types for different kinds of information.
For example:
textis used for general text.emailis used for email addresses.numberis used for numbers.urlis used for website addresses.dateis used for dates.telis commonly used for telephone numbers.
When you use the appropriate input type, the browser can perform basic checks automatically.
For example, an email input expects information that follows the general structure of an email address.
A Simple Form Validation Example
Let’s look at a complete beginner-friendly example.
The following form includes a name field, an email field, a password field, and an age field. Each one demonstrates a different validation feature.
<form>
  <label for="name">Full Name:</label>
  <input type="text" id="name" name="name" required>

  <label for="email">Email:</label>
  <input type="email" id="email" name="email" required>

  <label for="password">Password:</label>
  <input type="password" id="password" name="password" minlength="8" required>

  <label for="age">Age:</label>
  <input type="number" id="age" name="age" min="18" max="100" required>

  <button type="submit">Submit</button>
</form>
Although the example is short, several things are happening.
The name field is required, meaning the user cannot leave it empty.
The email field uses type="email", allowing the browser to check whether the entered value looks like an email address.
The password field uses minlength="8", meaning the password should contain at least eight characters.
The age field uses min="18" and max="100", limiting the accepted number to that range.
The browser handles these basic checks for you.
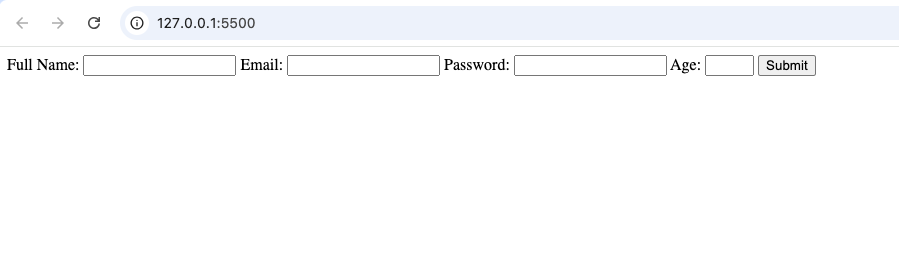
Mind You The Example Up There Is Without CSS Just With The HTML Example
Understanding minlength
The minlength attribute specifies the minimum number of characters that a user should enter.
For example, a password field with a minimum length of eight characters will not accept a shorter value during normal browser validation.
This is useful when creating:
- Password fields
- Usernames
- Comments
- Short descriptions
Keep in mind that minlength counts characters, not words.
Understanding maxlength
maxlength works in the opposite direction.
It sets the maximum number of characters allowed in a field.
For example, you might use it when a form asks for a short message and you do not want users to enter thousands of characters.
This can help keep user input within reasonable limits.
Using min and max
The min and max attributes are commonly used with numerical inputs.
For example, an age field could have a minimum of 18 and a maximum of 100.
This means the browser can reject values outside that range.
These attributes are useful for:
- Age
- Quantity
- Prices
- Scores
- Product amounts
They are especially helpful when you know the acceptable numerical range in advance.
Understanding pattern
The pattern attribute allows you to specify a particular format that the user’s input should follow.
It uses a regular expression to describe the expected format.
For beginners, regular expressions can look complicated, so there is no need to master them immediately.
The important idea is that pattern allows you to create more specific validation rules.
For example, it can be used when you want a particular format for:
- Identification numbers
- Usernames
- Reference codes
- Certain phone number formats
As your HTML and JavaScript skills improve, you can learn more about regular expressions and create more advanced patterns.
What Happens When Validation Fails?
When a user submits a form that does not meet the validation rules, the browser normally stops the submission.
It then displays a message explaining what needs to be corrected.
For example, if a required field is empty, the browser may tell the user to fill it in.
If an email field contains an invalid format, the browser may ask the user to enter a valid email address.
This is known as constraint validation.
The exact wording and appearance of validation messages can vary between browsers.
HTML Validation Does Not Replace Server-Side Validation
This is an important point for beginners.
HTML validation is useful, but it should not be considered a complete security system.
A user can disable JavaScript, modify the webpage, or send information directly to a server without following the browser’s validation rules.
For real applications, the server should validate submitted information again.
Think of it this way:
Client-side validation improves the user experience.
Server-side validation protects the application and checks the data before it is trusted.
Using both provides a stronger approach.
HTML Validation vs JavaScript Validation
You may eventually wonder why developers use JavaScript if HTML already provides validation.
The answer is that HTML handles many basic requirements, while JavaScript can create more customized behavior.
HTML is excellent for simple rules such as:
- Required fields
- Email format
- Minimum length
- Maximum length
- Number ranges
JavaScript becomes useful when you need more complex logic.
For example, you might want to compare two password fields and make sure they match.
You might also want to display a custom message beside a particular field or change the page based on the user’s input.
For beginners, it is usually a good idea to learn HTML’s built-in validation first before moving into more complicated JavaScript validation.
Making Forms Easier for Users
Good validation should help users rather than frustrate them.
Avoid creating unnecessary rules that make simple forms difficult to complete.
For example, if a username does not actually need to be a specific length, there may be no reason to impose an arbitrary restriction.
Validation should have a clear purpose.
It should tell users what information is expected and make it easy to correct mistakes.
Use Labels With Form Fields
Every important form field should have a clear label.
For example:
Full Name
is much easier to understand than an unexplained input box.
Labels also improve accessibility because assistive technologies can associate the label with its corresponding form control.
A well-designed form should make it obvious:
- What information is required.
- What format is expected.
- What the user should do when an error occurs.
Do Not Rely Only on Placeholder Text
A placeholder can provide an example of what a user should enter, but it should not normally replace a proper label.
For example, a placeholder might show:
example@email.com
That can be useful, but the field should still have a visible or properly associated label such as Email Address.
Placeholders can disappear when users begin typing, while labels remain useful throughout the interaction.
Common Beginner Mistakes
There are several mistakes beginners commonly make when working with form validation.
Using required Everywhere
Not every field needs to be mandatory.
Only require information that is genuinely necessary.
Choosing the Wrong Input Type
If you are asking for an email address, use the email input type rather than a general text field.
Choosing the appropriate type gives the browser more information about the expected input.
Creating Rules Without Explaining Them
If a password must contain at least eight characters, tell the user.
Clear instructions make validation less frustrating.
Depending Completely on Browser Messages
Browser validation messages are useful, but they may look different across browsers.
Larger applications often provide additional custom feedback.
Forgetting Server-Side Validation
Never assume that browser validation makes submitted data trustworthy.
A server should validate important data again.
Practice Project: Create a Registration Form
One of the best ways to understand HTML form validation is to build a small registration form.
Start with:
- Full name
- Password
- Age
- Submit button
Then add validation rules.
Make the name and email required.
Set a minimum password length.
Set a reasonable age range.
After creating the form, test it by intentionally entering incorrect information.
Try submitting the form with empty fields.
Enter an invalid email address.
Try a password that is too short.
Enter an age outside the accepted range.
Watching the browser respond to each situation will help you understand how validation works.
Another Practice Project: Contact Form
You can also create a simple contact form containing:
- Name
- Subject
- Message
Make the important fields required.
Set a maximum length for the subject if necessary.
For the message field, you can decide whether a minimum or maximum length makes sense for your project.
This is a good project because contact forms are common in real websites.
When Should You Use JavaScript?
Start with HTML validation whenever the requirement is simple.
If you later need more advanced behavior, JavaScript can extend your form.
For example, JavaScript can help you:
- Compare two values.
- Display custom error messages.
- Validate information while the user is typing.
- Enable or disable sections of a form.
- Create more complex validation rules.
The important thing is not to use JavaScript simply because you can.
If HTML can solve the problem cleanly, built-in HTML validation is often a good starting point.
HTML form validation is an important skill for beginners because forms are used throughout the web. Whether you are building a login page, registration form, contact page, checkout system, or newsletter signup, users need a clear way to enter correct information.
The good news is that HTML provides several built-in tools for basic validation. Attributes such as required, type, minlength, maxlength, min, max, and pattern can handle many common requirements without requiring large amounts of JavaScript.
The key is to understand what each validation feature is designed to do and use it where it makes sense.
Start with simple forms and test different situations yourself. Leave required fields empty, enter invalid information, and see how the browser responds. Once you become comfortable with HTML validation, you can move on to JavaScript-based validation and eventually server-side validation.
Good form validation is not just about stopping incorrect information. It is about helping users complete forms easily, clearly, and with fewer mistakes.

Dope Article