When you start learning CSS, one of the first things you need to understand is how CSS knows which HTML elements to style.
You might write a CSS rule that changes a heading to blue, increases the size of a paragraph, or gives a button a background color. But how does CSS know which heading, paragraph, or button you are talking about?
This is where CSS selectors come in.
CSS selectors tell the browser which HTML elements a CSS rule should apply to. Once you understand selectors, writing CSS becomes much easier because you can control exactly which parts of a webpage receive a particular style.
In this guide, we will explain CSS selectors step by step, starting with the simplest selectors and gradually moving into more useful ones. The examples are designed for beginners who are practicing HTML and CSS and want to understand how selectors work in real projects.
What Is a CSS Selector?
A CSS selector is a pattern used to select HTML elements that you want to style.
For example, imagine you have a heading in HTML:
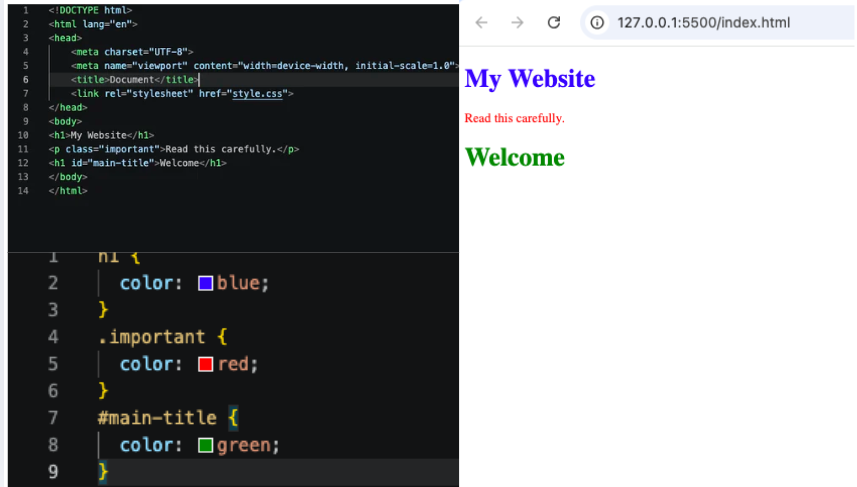
<h1>My Website</h1>
You could use the h1 selector in CSS to target that heading.
h1 {
  color: blue;
}
Here, h1 is the selector.
The browser reads the rule and understands that the style should be applied to the <h1> element.
A CSS rule normally has three important parts:
- Selector — identifies the HTML element
- Property — describes what you want to change
- Value — describes how you want to change it
So in color: blue;, color is the property and blue is the value.
Why Are CSS Selectors Important?
Without selectors, CSS would have no reliable way to target specific elements.
Imagine a webpage containing:
- 5 headings
- 10 paragraphs
- 3 buttons
- 4 images
- Several sections
You may want all paragraphs to have one style, while only one particular paragraph needs a different style.
Selectors allow you to make these distinctions.
They are therefore one of the most important parts of CSS.
Once you understand selectors, you can begin controlling the appearance of an entire webpage with much greater precision.
1. The Element Selector
The element selector is one of the easiest CSS selectors to learn.
It selects HTML elements based on their tag name.
For example:
p {
  font-size: 18px;
}
This selects every <p> element on the page.
If your HTML contains several paragraphs, the rule will affect all of them.
Element selectors are useful when you want to establish a general style for an HTML element.
For example, you might use them to set a basic style for:
- All paragraphs
- All headings
- All buttons
- All links
- All images
This is often a good starting point when creating the general design of a webpage.
2. The Class Selector
The class selector is one of the selectors you will use frequently in real projects.
A class allows you to give one or more HTML elements a specific name and then target those elements from CSS.
For example:
<p class="important">Read this carefully.</p>
In CSS, you target the class using a period:
.important {
  color: red;
}
The period before important tells CSS that you are selecting a class.
One major advantage of classes is that the same class can be used on multiple elements.
For example, several buttons could have the same class and therefore share the same design.
Classes are especially useful for creating reusable styles.
You might create classes such as:
.button.card.container.title.warning.highlight
Instead of creating a completely different CSS rule for every individual element, you can reuse a class wherever the same design is needed.
3. The ID Selector
An ID selector targets an HTML element using its id attribute.
For example:
<h1 id="main-title">Welcome</h1>
The CSS selector would be:
#main-title {
  color: green;
}
The # symbol tells CSS that you are selecting an ID.
An ID should normally identify one unique element on a page.
For example, you might have an element with an ID such as:
#header#main-title#contact#footer
IDs can be useful when you need to target a specific element.
However, for reusable styling, classes are generally more flexible.
4. The Universal Selector
The universal selector selects every element on the page.
It is represented by an asterisk:
* {
  margin: 0;
}
This means the rule applies to all elements.
The universal selector is sometimes used when developers want to establish basic styles across the entire webpage.
For example, developers may use it as part of a CSS reset to remove default browser spacing.
However, because it targets everything, it should be used thoughtfully.
5. Grouping Selectors
Sometimes you want several different HTML elements to have the same style.
Instead of writing separate rules, you can group the selectors together.
For example:
h1, h2, p {
  font-family: Arial, sans-serif;
}
This applies the same font to the <h1>, <h2>, and <p> elements.
Grouping is useful because it can make your CSS shorter and easier to maintain.
If several elements need exactly the same style, grouping them can prevent unnecessary repetition.
6. Descendant Selector
A descendant selector allows you to select an element that exists inside another element.
For example, imagine a paragraph inside a <div>:
<div>
  <p>Hello</p>
</div>
You could target the paragraph with:
div p {
  color: blue;
}
This means:
Select paragraphs that are inside a
<div>.
This is useful when you want to style an element only when it appears within a particular area of the page.
For example, you may have paragraphs throughout your website but want paragraphs inside an article to look different.
7. Child Selector
The child selector is similar to the descendant selector, but it is more specific.
It uses the > symbol.
For example:
nav > a {
  color: black;
}
This targets links that are direct children of the <nav> element.
The difference is important.
A descendant selector can target an element nested several levels deep.
A child selector targets only an element that is directly inside its parent.
Think of it as the difference between:
inside something
and
directly inside something.
8. Adjacent Sibling Selector
The adjacent sibling selector uses the + symbol.
It allows you to select an element that comes immediately after another element.
For example:
h2 + p {
  margin-top: 0;
}
This targets a paragraph that immediately follows an <h2>.
This can be useful for controlling spacing and relationships between elements.
For example, you may want the first paragraph after a heading to have a particular style.
9. General Sibling Selector
The general sibling selector uses the ~ symbol.
It selects matching elements that appear after another element and share the same parent.
For example:
h2 ~ p {
  color: gray;
}
This can select paragraphs that appear after the <h2> within the same parent.
Unlike the adjacent sibling selector, the matching element does not have to appear immediately after the first element.
10. Attribute Selectors
CSS can also select HTML elements based on their attributes.
For example:
<input type="text">
<input type="email">
You can target email inputs using an attribute selector:
input[type="email"] {
  border: 1px solid gray;
}
This means:
Select an
<input>whosetypeattribute is
Attribute selectors are particularly useful when working with forms.
You can target elements based on attributes such as:
typenamehreftargetdisabledrequired
This gives you more control than simply selecting every input.
11. Pseudo-Classes
Pseudo-classes allow you to style an element based on a particular state or condition.
One of the most familiar examples is :hover.
For example:
button:hover {
  background: black;
}
This changes the button’s appearance when the user moves the mouse over it.
Some commonly used pseudo-classes include:
:hover:focus:active:first-child:last-child:checked:disabled
Pseudo-classes are extremely useful for interactive websites.
For example, a button can change when someone hovers over it, an input can receive a different border when it is focused, and a checkbox can be styled differently when selected.
12. Pseudo-Elements
Pseudo-elements are slightly different from pseudo-classes.
They allow you to style a particular part of an element or create generated content.
Common examples include:
::before::after::first-letter::first-line
For example, ::first-letter can be used to style the first letter of a paragraph.
Pseudo-elements are useful when you want to add decorative details without adding extra HTML elements.
CSS Selectors Can Be Combined
One of the powerful things about CSS is that selectors can be combined.
For example:
.card p {
  color: gray;
}
This selects paragraphs inside elements with the card class.
You can also combine a class with a pseudo-class:
.button:hover {
  transform: scale(1.05);
}
This targets an element with the button class when the user hovers over it.
As you become more comfortable with CSS, combining selectors will allow you to create much more precise designs.
Class Selector vs ID Selector
One common question beginners have is:
Should I use a class or an ID?
Both can target elements, but they are commonly used for different purposes.
A class is designed to be reusable.
For example, you could have ten buttons with the same class.
An ID is intended to identify a specific element.
For example, you could have one main heading with a particular ID.
A simple way to remember it is:
Class = reusable
ID = unique
For most reusable visual styles, classes are usually the better choice.
Understanding Selector Specificity
As you learn more CSS, you will eventually notice that multiple selectors can target the same element.
For example, a paragraph could have:
- An element selector
- A class selector
- An ID selector
CSS needs a way to decide which style has priority.
This is called specificity.
In general, more specific selectors have greater priority than less specific selectors.
A simplified order is:
Element → Class → ID
So an ID selector generally has greater specificity than a class selector, while a class selector is generally more specific than an element selector.
Understanding specificity becomes very important when your CSS files become larger.
Don’t Make Selectors Too Complicated
Beginners sometimes try to create extremely long selectors.
For example, instead of using a simple class, they may target an element through several layers of HTML.
This can make CSS difficult to maintain.
A cleaner approach is often to give an element a meaningful class and target that class directly.
Simple CSS is usually easier to understand and modify later.
Common CSS Selector Mistakes
Using the Wrong Symbol
Remember the basic symbols:
.= class#= ID*= universal selector>= direct child+= adjacent sibling~= general sibling:= pseudo-class::= pseudo-element
Mixing these symbols is a common beginner mistake.
Forgetting the Dot Before a Class
If your HTML contains:
<div class="card">
your CSS selector should be:
.card
not:
card
Without the dot, CSS interprets card as an element selector.
Using an ID for Everything
IDs are not meant to replace classes.
If you have several elements that need the same style, use a class.
Making Selectors Too Specific
Very complicated selectors can make your CSS harder to manage.
Whenever possible, keep selectors clear and purposeful.
A Simple Way to Practice CSS Selectors
The best way to learn selectors is to build a small HTML page and experiment.
Create a page containing:
- A heading
- Several paragraphs
- Two or three buttons
- A card
- A form
- A navigation menu
Then practice selecting different elements.
Start with an element selector.
Move to classes.
Then practice IDs.
After that, try descendant selectors, attribute selectors, and pseudo-classes.
For example, you could make a button change appearance when you hover over it.
Then create another button with a different class and give it a different design.
This type of practice will make selectors much easier to remember than simply reading about them.
CSS Selectors in Real Projects
Selectors are used everywhere in web development.
When you create a navigation menu, selectors control the links.
When you create a login form, selectors control the inputs and buttons.
When you create a blog, selectors control headings, paragraphs, images, and article sections.
When you build a portfolio, selectors control cards, project buttons, navigation, and contact sections.
Even complicated websites are ultimately built using the same basic CSS concepts.
The difference is that professional projects often use selectors together with more advanced CSS techniques.
Quick CSS Selector Cheat Sheet
| Selector | What It Selects |
|---|---|
p | All <p> elements |
.card | Elements with the card class |
#header | Element with the header ID |
* | All elements |
h1, p | All <h1> and <p> elements |
div p | Paragraphs inside a <div> |
div > p | Paragraphs directly inside a <div> |
h2 + p | Paragraph immediately after an <h2> |
h2 ~ p | Paragraph siblings after an <h2> |
input[type="text"] | Text inputs |
button:hover | Buttons while hovered |
p::first-letter | First letter of paragraphs |
You do not need to memorize all of these immediately.
Learn the basic selectors first and gradually add the others as your projects become more advanced.
CSS selectors are the connection between your HTML structure and your CSS design.
They tell the browser exactly which elements should receive a particular style. Once you understand how selectors work, you can move beyond styling an entire page and start controlling individual components with much greater precision.
Start with the basic selectors:
- Element
- Class
- ID
- Universal
Then gradually learn:
- Grouping
- Descendant and child selectors
- Sibling selectors
- Attribute selectors
- Pseudo-classes
- Pseudo-elements
You do not need to master every selector in one day. The most effective approach is to learn one selector, use it in a small project, and then move on to another.
As you build more HTML and CSS projects, selectors will become a natural part of your workflow. Before long, you will be able to look at an HTML structure and immediately know which selector you need to style it.